Secure MCP Tunnel: Connecting Codex CLI to Private MCP Servers Without Opening Inbound Ports
Secure MCP Tunnel: Connecting Codex CLI to Private MCP Servers Without Opening Inbound Ports
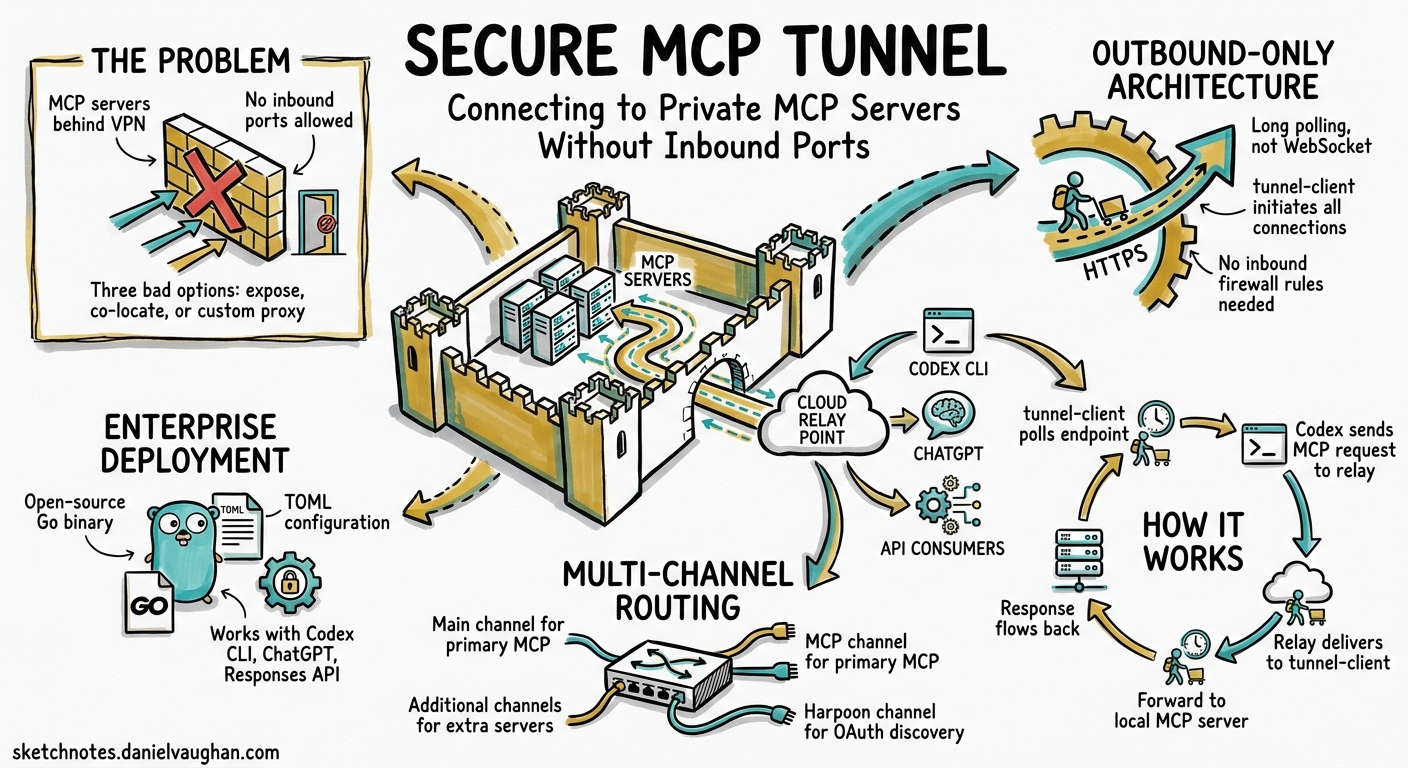
Enterprise teams running internal MCP servers — wrapping proprietary databases, CI systems, or compliance tools — face a persistent tension: Codex and ChatGPT need to reach those servers, but security policy forbids punching inbound holes through the firewall. OpenAI’s Secure MCP Tunnel, announced on 19 May 2026 1, resolves this by routing all traffic through an outbound-only HTTPS connection initiated from inside the private network.
This article covers the architecture, deployment, and Codex CLI integration of the tunnel-client, the open-source Go binary that bridges your private MCP servers to OpenAI’s hosted tunnel endpoint.
The Problem: MCP Servers Behind the Firewall
Codex CLI’s MCP integration supports two transports: stdio (local child process) and Streamable HTTP (remote URL) 2. Streamable HTTP works well for publicly reachable servers, but enterprise internal tools — a Jira wrapper, a PagerDuty bridge, a proprietary data lake query server — sit behind VPNs, private subnets, or zero-trust perimeters.
Before Secure MCP Tunnel, teams had three unsatisfying options:
- Expose the MCP server publicly — unacceptable for most security teams.
- Run Codex CLI on the same network — works for individual developers but breaks for Codex Cloud tasks, ChatGPT threads, and the Responses API.
- Build a custom reverse proxy — engineering overhead, bespoke authentication, no standard observability.
The tunnel eliminates all three by keeping the MCP server entirely within the customer-controlled environment whilst giving OpenAI products a stable endpoint to call 3.
Architecture: Outbound-Only Long Polling
The Secure MCP Tunnel uses a long-polling architecture rather than persistent WebSocket connections, which simplifies firewall traversal.
sequenceDiagram
    participant Codex as Codex CLI / ChatGPT / Responses API
    participant TP as OpenAI Tunnel Endpoint
    participant TC as tunnel-client (your network)
    participant MCP as Private MCP Server

    TC->>TP: GET /v1/tunnel/{id}/poll (outbound HTTPS)
    Codex->>TP: MCP JSON-RPC request
    TP-->>TC: Queued request delivered
    TC->>MCP: Forward to local MCP server
    MCP-->>TC: Response
    TC->>TP: POST /v1/tunnel/{id}/response
    TP-->>Codex: MCP JSON-RPC response
Key architectural properties:
- Outbound-only:
tunnel-clientinitiates all connections via HTTPS. No inbound firewall rules required 3. - Long polling: The client uses
GET /v1/tunnel/{tunnel_id}/pollto retrieve queued requests andPOST /v1/tunnel/{tunnel_id}/responseto return results 4. - Multi-channel routing: A
mainchannel targets the primary MCP binding, with additional configured channels routing to separate MCP servers. Aharpoonchannel handles allowlisted outbound HTTP callouts for OAuth metadata discovery 4. - Transport flexibility: The client can forward to MCP servers via Streamable HTTP, stdio, or in-memory transport 4.
Prerequisites
Before deploying, ensure you have:
| Requirement | Source |
|---|---|
tunnel_id |
Platform tunnel settings at platform.openai.com 3 |
| Runtime API key with Tunnels Read + Use permissions | Organisation API keys page 4 |
| MCP server accessible via stdio or HTTP from the client host | Your infrastructure |
Outbound HTTPS from the host running tunnel-client |
Network policy |
Tunnel creation and management requires a ChatGPT Business or Enterprise workspace 3.
Deploying tunnel-client
Installation
Download the latest binary from the openai/tunnel-client releases page 4. The current release is v0.0.8 (May 2026). Alternatively, build from source:
git clone https://github.com/openai/tunnel-client.git
cd tunnel-client
make admin-ui
go build -o bin/tunnel-client ./cmd/client
Profile Initialisation
The tunnel-client uses profiles to store connection configuration. Initialise one for a local stdio MCP server:
export CONTROL_PLANE_API_KEY="sk-..."

tunnel-client init \
  --sample sample_mcp_stdio_local \
  --profile local-jira \
  --tunnel-id tunnel_0123456789abcdef0123456789abcdef \
  --mcp-command "python /opt/mcp-servers/jira-server.py"
For an HTTP-based MCP server already running on your network:
tunnel-client init \
  --sample sample_mcp_http \
  --profile internal-datalake \
  --tunnel-id tunnel_0123456789abcdef0123456789abcdef \
  --mcp-server-url https://mcp.internal.example.com/mcp
Validation and Launch
Always run diagnostics before starting the daemon:
# Validate configuration, connectivity, and permissions
tunnel-client doctor --profile local-jira --explain

# Start the tunnel
tunnel-client run --profile local-jira
The doctor command checks control-plane reachability, API key permissions, MCP server availability, and profile consistency 4. Keep the client running — discovery and tool calls depend on active polling.
Security Model
The tunnel’s security posture is built around several layers:
Network Isolation
The private MCP server address never leaves your network. tunnel-client uses it locally to forward requests; the address is not transmitted to OpenAI 3. All communication with the control plane occurs over outbound HTTPS.
Enterprise TLS Options
For organisations requiring mutual TLS, the client supports client certificate authentication:
tunnel-client run --profile local-jira \
  --control-plane.client-cert /etc/pki/tunnel/client.crt \
  --control-plane.client-key /etc/pki/tunnel/client.key
When mTLS is configured against default OpenAI endpoints, traffic automatically routes through https://mtls.api.openai.com 4.
Permission Model
The tunnel uses a tiered permission structure 4:
| Role | Required Permissions |
|---|---|
Runtime user (runs tunnel-client) |
Tunnels Read + Use |
| Tunnel manager (creates/configures tunnels) | Tunnels Read + Manage (+ Use if running daemon) |
| Admin key creator | Platform admin-key permissions |
OAuth Handling
If your MCP server uses OAuth, the tunnel handles metadata discovery by fetching Protected Resource Metadata on startup and using authorization_servers[0] from the PRMD as the source of truth 4. The authorisation server itself must be reachable — it is not automatically tunnelled.
Integrating with Codex CLI
The tunnel-client ships with first-class Codex CLI integration via dedicated subcommands 4:
# Check Codex CLI installation status
tunnel-client codex status

# Install or upgrade Codex CLI
tunnel-client codex install
tunnel-client codex upgrade

# Install a tunnel-backed MCP server as a Codex plugin
tunnel-client codex plugin install

# Start an interactive Codex session with tunnel context
tunnel-client codex assistant "Review the latest Jira tickets"
The codex plugin install command registers the tunnel-backed MCP server in your Codex CLI’s config.toml, making the private server’s tools available in interactive sessions, codex exec pipelines, and Codex Cloud tasks.
For manual configuration, add the tunnel-backed URL to your Codex CLI config:
# ~/.codex/config.toml
[mcp_servers.internal-jira]
url = "https://tunnel.api.openai.com/v1/mcp/tunnel_0123456789abcdef"
bearer_token_env_var = "OPENAI_API_KEY"
startup_timeout_sec = 15
tool_timeout_sec = 120
Observability and Operations
Health Endpoints
The tunnel-client exposes four operational endpoints 3 4:
| Endpoint | Purpose |
|---|---|
/healthz |
Liveness check for orchestrators |
/readyz |
Readiness probe — confirms control-plane connectivity |
/metrics |
Prometheus-compatible metrics |
/ui |
Admin interface with channel status and log controls |
Admin UI
The embedded admin UI provides:
- Overview tab: Channel availability and disable reasons at a glance.
- Logs tab: Runtime log-level adjustment (debug/info/warn) without restart.
- Export: Generates a redacted support bundle containing logs, metrics snapshot, and runtime configuration — safe to share with OpenAI support 4.
Containerised Deployment
For production environments, run tunnel-client as a container:
docker run -d \
  --name mcp-tunnel \
  -e CONTROL_PLANE_API_KEY="sk-..." \
  -e CONTROL_PLANE_TUNNEL_ID="tunnel_..." \
  -p 8080:8080 \
  --restart unless-stopped \
  openai/tunnel-client:latest \
  run --profile /config/profile.yaml
The Docker image ships with the admin UI pre-built. Expose port 8080 internally for health checks and metrics scraping.
Architecture Patterns
Pattern 1: Single Team, Single MCP Server
The simplest deployment — one tunnel-client instance bridging one internal tool:
graph LR
    A[Codex CLI] --> B[OpenAI Tunnel Endpoint]
    B --> C[tunnel-client]
    C --> D[Internal Jira MCP Server]
Pattern 2: Multi-Server Hub
Route multiple MCP servers through one tunnel-client using channel configuration:
graph LR
    A[Codex CLI] --> B[OpenAI Tunnel Endpoint]
    B --> C[tunnel-client]
    C --> D[Jira MCP]
    C --> E[PagerDuty MCP]
    C --> F[Data Lake MCP]
The main channel handles the primary MCP binding, whilst additional channels route to separate server bindings 4.
Pattern 3: Per-Environment Isolation
Deploy separate tunnel instances per environment (staging, production) with distinct tunnel_id values and permission scopes. This ensures a staging Codex session cannot accidentally invoke production tools.
Comparison with Alternatives
| Approach | Inbound ports | Multi-surface | Observability | Effort |
|---|---|---|---|---|
| Public MCP server | Yes | Yes | Custom | Medium |
| VPN + Streamable HTTP | No | CLI only | Custom | High |
| Reverse proxy (nginx/Caddy) | Yes | Partial | Custom | High |
| Docker MCP Gateway 5 | No | CLI only | Built-in | Medium |
| Secure MCP Tunnel | No | All OpenAI surfaces | Built-in | Low |
The tunnel’s key advantage is multi-surface support: the same private MCP server becomes accessible from Codex CLI, Codex Cloud, ChatGPT, and the Responses API through a single tunnel_id 3.
Limitations and Caveats
- ChatGPT Business or Enterprise required: The tunnel feature is not available on Plus or free plans 3.
- Latency overhead: Long polling adds round-trip latency compared to direct stdio or local HTTP connections. For latency-sensitive tools, consider running MCP servers locally via stdio when using Codex CLI directly.
- OAuth server reachability: The authorisation server used by your MCP server must be independently reachable; it is not tunnelled automatically 3.
- Early release: The tunnel-client is at v0.0.8 as of May 2026 4. Expect API surface changes. Pin your binary version in production deployments.
Getting Started Checklist
- Create a tunnel in Platform settings
- Generate a runtime API key with Tunnels Read + Use permissions
- Download
tunnel-clientfrom GitHub releases - Run
tunnel-client initwith your MCP server command or URL - Run
tunnel-client doctor --explainto validate - Start the tunnel with
tunnel-client run - Register in Codex CLI with
tunnel-client codex plugin install - Test with
tunnel-client codex assistant "list available tools"
Citations
-
OpenAI API Changelog, “Secure MCP Tunnel”, 19 May 2026. https://developers.openai.com/api/docs/changelog ↩
-
OpenAI, “Model Context Protocol — Codex”, 2026. https://developers.openai.com/codex/mcp ↩
-
OpenAI, “Secure MCP Tunnels Guide”, 2026. https://developers.openai.com/api/docs/guides/secure-mcp-tunnels ↩ ↩2 ↩3 ↩4 ↩5 ↩6 ↩7 ↩8 ↩9
-
OpenAI, “tunnel-client”, GitHub repository, 2026. https://github.com/openai/tunnel-client ↩ ↩2 ↩3 ↩4 ↩5 ↩6 ↩7 ↩8 ↩9 ↩10 ↩11 ↩12 ↩13 ↩14
-
Docker, “Connect Codex to MCP Servers via Docker MCP Toolkit”, 2026. https://www.docker.com/blog/connect-codex-to-mcp-servers-mcp-toolkit/ ↩