Rapid Prototyping with Codex CLI: From Screenshot to Working Application
Rapid Prototyping with Codex CLI: From Screenshot to Working Application
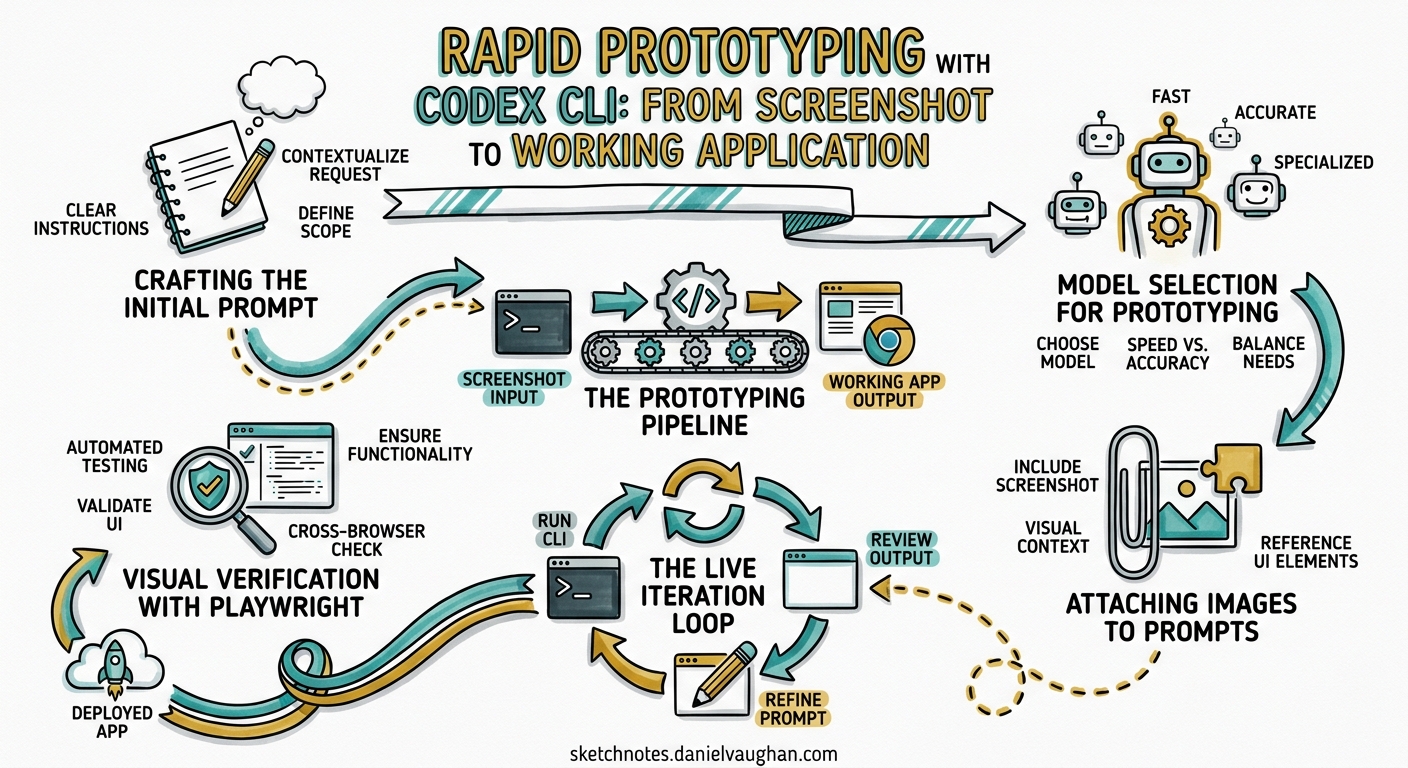
Design handoff has always been a bottleneck. Designers produce pixel-perfect mocks; developers spend hours interpreting spacing tokens and hover states from static exports. Codex CLI’s multimodal image capabilities — combined with the Playwright interactive skill and the in-app browser — collapse that cycle from hours to minutes. This article walks through the complete screenshot-to-working-application workflow, covering image input methods, prompt engineering for visual fidelity, live iteration patterns, and the verification loop that keeps output honest.
The Prototyping Pipeline
The workflow follows a four-stage pipeline that maps directly to OpenAI’s official prototyping workflow documentation1.
flowchart LR
    A["Screenshot / Design Mock"] --> B["Attach + Prompt"]
    B --> C["Codex Generates Code"]
    C --> D["Visual Verification"]
    D -->|"Iterate"| B
    D -->|"Ship"| E["Commit"]
Each stage has specific tooling and configuration requirements. Getting them right up front avoids the most common failure mode: Codex generating a plausible-looking component that diverges from the design in subtle but costly ways.
Attaching Images to Prompts
Codex CLI accepts PNG and JPEG inputs through three mechanisms2:
# Flag-based attachment (single or multiple images)
codex -i screenshot.png "Implement this dashboard"
codex --image desktop.png,mobile.png "Build responsive layout"

# Drag-and-drop into the TUI
# Drag the file from your file manager into the terminal window

# Paste from clipboard
# Cmd+V (macOS) or Ctrl+V (Linux/Windows) inside the TUI
For multi-state designs, comma-separated files via --image are the most reliable method. Providing desktop, mobile, hover, and empty states in a single prompt gives Codex the complete picture3. The official use-case documentation notes that “a single screenshot can be enough for a narrow task, but the handoff gets better when you include multiple states”3.
Crafting the Initial Prompt
The prompt structure matters more than most developers expect. A bare “build this” attached to a screenshot produces generic output. The official workflow documentation recommends specifying three categories of constraint1:
- Framework and tooling — React, Vue, Svelte; bundler; CSS approach
- Layout fidelity — spacing, typography, colour tokens to match
- Deliverables — routes, components, README, dev server instructions
Here is a practical example adapted from the official Codex workflows page1:
Create a new dashboard page based on this image.

Constraints:
- Use React, Vite, and Tailwind CSS. Write all code in TypeScript.
- Match spacing, typography, and layout hierarchy as closely as possible.
- Reuse existing design system components and tokens from src/components/.
- Do NOT invent a parallel component system.

Deliverables:
- A new route at /dashboard that renders the UI
- Any small components needed, placed in src/components/dashboard/
- Updated router configuration
- README section with instructions to run locally
The instruction to reuse existing components is critical. Without it, Codex tends to create standalone styled elements that duplicate your design system3. The responsive frontend designs guide explicitly warns: “Codex works best when the target repo already has a clear component layer”3.
Non-Obvious Behaviours
Screenshots encode layout but not interaction. Always specify in text1:
- Hover and focus states
- Form validation rules
- Keyboard navigation requirements
- Loading and empty-state behaviour
- Animation or transition expectations
Model Selection for Prototyping
Model choice affects both quality and speed. As of April 2026, the relevant options are45:
| Model | Best For | Speed | Context |
|---|---|---|---|
| GPT-5.5 | Complex multi-file prototypes, design system integration | Moderate | 1M tokens |
| GPT-5.4 | General prototyping, good balance | Moderate | 1M tokens |
| GPT-5.3-Codex-Spark | Rapid iteration, small component tweaks | >1,000 tok/s | 128K tokens |
For the initial scaffold, GPT-5.5 or GPT-5.4 produce more accurate layout interpretations4. Once the structure is in place and you are iterating on spacing and colour, switching to Codex-Spark via /model gpt-5.3-codex-spark gives near-instant feedback at 15× the speed of the standard model5.
# Start with the flagship for structural accuracy
codex --model gpt-5.5 -i mock.png "Build the dashboard page..."

# Switch mid-session for rapid iteration
/model gpt-5.3-codex-spark
The Live Iteration Loop
Once Codex generates the initial scaffold, the real productivity gain comes from the tight iteration cycle. The official “Iterate on UI with live updates” workflow1 prescribes a two-terminal pattern:
Terminal 1 — Dev server:
npm run dev
# or: pnpm dev / yarn dev / bunx vite
Terminal 2 — Codex CLI:
codex
With the dev server running and hot module replacement active, every file Codex writes triggers an immediate browser refresh. The workflow becomes conversational:
> Propose 2-3 styling improvements for the dashboard header.

[Codex suggests changes]

> Apply option 2. Also increase the card border-radius to match
  the design — the screenshot shows 12px, not 8px.

[Codex edits the file; browser refreshes]

> The sidebar width is 280px in the screenshot but you've set 256px.
  Fix that and ensure the main content area fills the remaining space.
Commit Early, Revert Freely
The official documentation recommends committing changes you like immediately and reverting those you do not1. Crucially, if you revert a change, tell Codex — otherwise it may overwrite your reversion on the next edit:
> I reverted the last change to the sidebar. The original padding
  was better. Do not change sidebar padding again.
Visual Verification with Playwright
For designs that must match screenshots at multiple breakpoints, the Playwright interactive skill closes the verification loop3. When the skill is installed, Codex can open the running application in a real browser, capture screenshots at specified viewport widths, and compare them against the original design references.
flowchart TB
    A["Design Screenshots"] --> B["Codex Generates Code"]
    B --> C["Playwright Opens Browser"]
    C --> D["Capture at 1440px, 768px, 375px"]
    D --> E["Compare Against References"]
    E -->|"Discrepancies Found"| F["Codex Iterates"]
    F --> C
    E -->|"Match Acceptable"| G["Commit"]
To activate this workflow, include the Playwright skill in your prompt3:
$playwright

Compare the current /dashboard route against the attached screenshots
at 1440px, 768px, and 375px widths. List any discrepancies in spacing,
colour, or layout, then fix the top 3 most visible issues.
This is particularly powerful for responsive layouts where manual browser resizing is tedious and error-prone.
The In-App Browser (Codex App)
For developers using the Codex desktop application rather than the CLI directly, the in-app browser provides an even tighter feedback loop6. Codex can operate the browser to navigate to local development URLs, take screenshots, click elements, and verify rendered output — all within the same window.
The browser supports6:
- Local development servers (
localhost:3000,localhost:5173, etc.) - File-backed pages (
file://URLs) - Public pages that do not require authentication
To use it, simply ask Codex to check the browser after making changes:
Start the dev server and open http://localhost:5173/dashboard
in the browser. Compare what you see against the attached screenshot
and fix any differences.
Figma MCP Integration
For teams with a Figma-based design workflow, the Figma MCP server provides programmatic access to design tokens, layout properties, and component structures7. Rather than exporting screenshots manually, you can point Codex directly at a Figma frame:
- Right-click a frame in Figma → Copy as → Copy link to selection
- Pass the link to Codex:
Help me implement this Figma design in code. Use my existing
design system components.

Figma link: https://www.figma.com/file/abc123/Dashboard?node-id=42:1337
The MCP server’s get_design_context tool extracts layout, styles, and component metadata7, giving Codex structured data rather than pixel inference. This produces significantly more accurate spacing and colour values than screenshot-only workflows.
Bidirectional Flow
The Figma integration also supports code-to-canvas conversion7. After Codex generates your UI, you can ask it to push the rendered result back into Figma as editable frames using the generate_figma_design tool — useful for design review cycles where stakeholders work exclusively in Figma.
Common Pitfalls and Mitigations
1. Parallel Component Systems
Problem: Codex creates new Card, Button, and Input components instead of using your existing ones.
Mitigation: Explicitly reference your component directory and include the constraint “Do NOT create new primitive components”3.
2. Hardcoded Dimensions
Problem: Codex matches the screenshot pixel-perfectly at one breakpoint but breaks at others.
Mitigation: Provide multiple viewport screenshots and specify responsive behaviour explicitly. Use the Playwright verification loop to catch breakpoint regressions.
3. Missing Interaction States
Problem: The prototype looks right but hover, focus, and active states are absent.
Mitigation: Include interaction state screenshots where possible. Where you cannot, describe states in text with specific CSS values1.
4. Image Generation Cost
Problem: Turns involving $imagegen or gpt-image-2 consume credits 3–5× faster than text-only turns2.
Mitigation: Use image generation only for asset creation (icons, illustrations), not for verification screenshots. Use Playwright for visual comparison instead.
A Complete Prototyping Session
Putting it all together, here is a realistic session flow:
# 1. Start with design references
codex --model gpt-5.5 \
  --image specs/dashboard-desktop.png,specs/dashboard-mobile.png \
  "Build a responsive dashboard page. Use React, Vite, Tailwind, TypeScript.
   Reuse components from src/components/ui/. Match the layout precisely.
   Create a /dashboard route. Include instructions to run locally."

# 2. Codex scaffolds the page, installs dependencies, configures routing

# 3. Start the dev server in another terminal
npm run dev

# 4. Switch to Spark for rapid iteration
/model gpt-5.3-codex-spark

# 5. Iterate on specifics
> The card grid should be 3 columns on desktop, 2 on tablet, 1 on mobile.
  The screenshot shows 24px gap between cards, not 16px.

# 6. Verify with Playwright
$playwright
Compare /dashboard against the attached screenshots at 1440px, 768px,
and 375px. List discrepancies and fix the top 5.

# 7. Commit when satisfied
> Commit these changes with message "feat: add dashboard page from design spec"
Conclusion
The screenshot-to-code workflow in Codex CLI is not a party trick — it is a legitimate prototyping accelerator when used with the right prompt structure, model selection, and verification tooling. The combination of multimodal image input, the Playwright skill for automated visual comparison, and Codex-Spark for rapid iteration creates a feedback loop that is materially faster than traditional design handoff. The key is treating Codex as a collaborator that needs explicit constraints, not a mind-reader that infers your design system from a single screenshot.
Citations
-
OpenAI, “Workflows – Codex,” OpenAI Developers, 2026. https://developers.openai.com/codex/workflows ↩ ↩2 ↩3 ↩4 ↩5 ↩6 ↩7
-
OpenAI, “Features – Codex CLI,” OpenAI Developers, 2026. https://developers.openai.com/codex/cli/features ↩ ↩2
-
OpenAI, “Build responsive front-end designs – Codex use cases,” OpenAI Developers, 2026. https://developers.openai.com/codex/use-cases/frontend-designs ↩ ↩2 ↩3 ↩4 ↩5 ↩6 ↩7
-
OpenAI, “Models – Codex,” OpenAI Developers, 2026. https://developers.openai.com/codex/models ↩ ↩2
-
OpenAI, “Introducing GPT-5.3-Codex-Spark,” OpenAI, February 2026. https://openai.com/index/introducing-gpt-5-3-codex-spark/ ↩ ↩2
-
OpenAI, “In-app browser – Codex app,” OpenAI Developers, 2026. https://developers.openai.com/codex/app/browser ↩ ↩2
-
OpenAI, “Building frontend UIs with Codex and Figma,” OpenAI Developers Blog, 2026. https://developers.openai.com/blog/building-frontend-uis-with-codex-and-figma ↩ ↩2 ↩3