Image generation in Codex CLI: gpt-image-2, the $imagegen skill, and visual development workflows
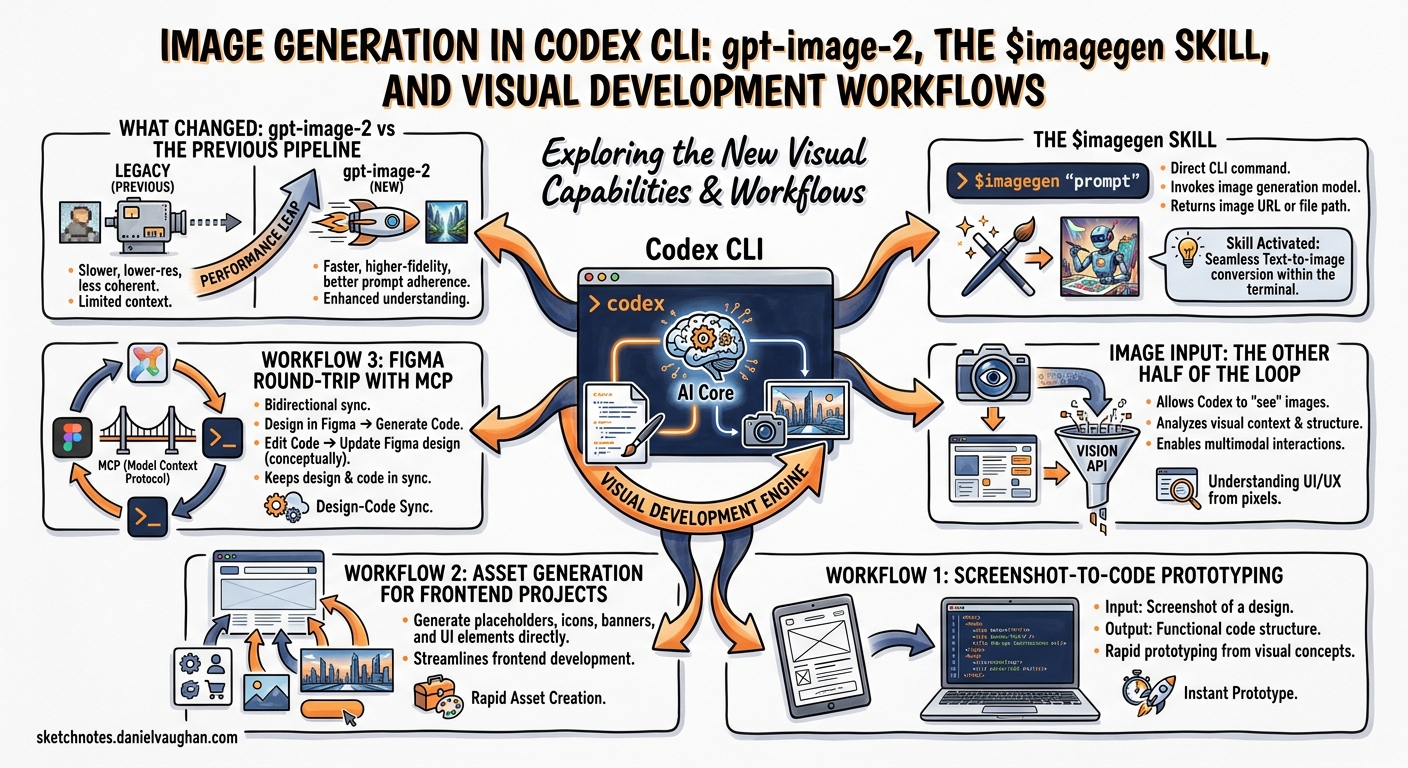
Image generation in Codex CLI: gpt-image-2, the $imagegen skill, and visual development workflows
On 21 April 2026 OpenAI launched gpt-image-2, a purpose-built image generation model that replaced the earlier gpt-image-1.5 as Codex CLI’s default12. Five weeks later, DALL-E 2 and DALL-E 3 were retired from the API entirely (12 May 2026)3. Codex CLI’s image story is now gpt-image-2 or nothing.
The earlier multimodal additions across v0.115 to v0.117 (March 2026) gave Codex CLI basic image input, attaching screenshots, inspecting visual output, and rudimentary generation4. gpt-image-2 turned those features into something production-useful: a complete design-to-code-to-asset loop inside the terminal, backed by the built-in $imagegen skill, Figma MCP integration, and Playwright-based visual verification.
This article covers the architecture, configuration and practical workflows that make image generation useful for senior developers, not as a toy, but as a prototyping tool with real cost implications.
What changed with gpt-image-2
gpt-image-1.5 capped at 1,536 x 1,024 resolution and lacked reasoning capabilities5. gpt-image-2 closes several gaps:
| Capability | gpt-image-1.5 | gpt-image-2 |
|---|---|---|
| Maximum resolution | 1,536 x 1,024 | 2K stable, 4K in beta63 |
| Text rendering accuracy | ~90 to 95 per cent | >99 per cent across Latin, CJK, Arabic1 |
| Reasoning mode | No | Yes (composition planning before rendering)1 |
| Aspect ratio flexibility | Limited | 3:1 to 1:36 |
| Batch generation | Single | Up to 10 images per call5 |
| Inpainting/outpainting | Basic | Mask-based precision editing6 |
| Transparent background | Supported | Not supported (chroma-key workaround)7 |
The reasoning mode matters most for developer workflows. Before rendering, gpt-image-2 analyses the prompt, plans composition and reasons through layout constraints1. For UI mockups and diagram generation, this translates to fewer iterations to reach a usable result.
Resolution note: 4K output (up to 3,840 x 2,160) is available through the API in beta. OpenAI flags anything above 2,560 x 1,440 as experimental3. If stability matters, generate at 2K and upscale externally.
The $imagegen skill
Codex CLI ships a built-in skill at codex-rs/skills/src/assets/samples/imagegen/SKILL.md that wraps image generation into a structured workflow8. You invoke it in three ways:
# Explicit skill mention
codex "Create a dark-mode dashboard header banner $imagegen"

# Natural language (implicit skill selection)
codex "Generate a set of SVG-style icons for a settings page"

# Via the /skills command in interactive mode
/skills
# Select imagegen from the list
Generated images save to $CODEX_HOME/generated_images/, typically ~/.codex/generated_images/. The skill instructs Codex to move project-bound assets into your workspace directory rather than leaving them at the default path8.
Two modes
The $imagegen skill operates in two modes8:
- Built-in tool (default). Uses the native
image_gentool. No API key required. Preferred for normal generation, editing and simple transparent requests. - CLI fallback. Uses
scripts/image_gen.py. RequiresOPENAI_API_KEY. Offersgenerate,editandgenerate-batchsubcommands. Use when the built-in tool cannot meet your needs or you need fine-grained control over parameters.
The skill will never silently downgrade from gpt-image-2 to gpt-image-1.5. If a request needs the older model (typically for transparency), it asks first8.
Transparent images: the chroma-key workaround
gpt-image-2 does not support background=transparent7. The skill works around this with a two-step process8:
- Generate the image on a flat chroma-key background (default
#00ff00, or#ff00fffor green subjects). - Run the bundled removal script:
python "${CODEX_HOME:-$HOME/.codex}/skills/.system/imagegen/scripts/remove_chroma_key.py" \
  --input source.png \
  --out final.png \
  --auto-key border \
  --soft-matte \
  --transparent-threshold 12 \
  --opaque-threshold 220 \
  --despill
This produces a proper alpha-channel PNG. The quality is good for prototyping and placeholder assets, though not pixel-perfect for production icon sets where you would still use a vector workflow.
Cost awareness
Image generation turns consume Codex usage limits three to five times faster than equivalent text-only turns2. For larger batches or CI pipelines, set OPENAI_API_KEY in your environment to switch to API pricing instead of consuming your ChatGPT plan allocation.
API pricing for gpt-image-2 is token-based6:
| Input type | Rate per million tokens |
|---|---|
| Text input | $5.00 |
| Image input | $8.00 |
| Cached image input | $2.00 |
| Output | $30.00 |
Per-image estimates at common resolutions:
| Quality | 1,024 x 1,024 | 1,024 x 1,536 |
|---|---|---|
| Low | ~$0.006 | ~$0.017 |
| Medium | ~$0.042 | ~$0.063 |
| High | ~$0.211 | ~$0.165 |
Rate limits cap at 250 images per minute for standard accounts. New accounts start at five images per minute6.
Image input: the other half of the loop
Image generation is useful only when paired with image input, feeding screenshots, mockups and design references back into Codex for comparison and iteration.
# Single image attachment
codex -i screenshot.png "Explain this layout and suggest improvements"

# Multiple images for comparison
codex --image current.png,reference.png "Compare these two layouts and list the differences"
Supported formats include PNG and JPEG2. In interactive mode, paste or drag images into the terminal composer. Codex processes attached images at full resolution, enabling pixel-level analysis of UI discrepancies.
Workflow 1: screenshot-to-code prototyping
The most practical workflow combines image input with code generation. OpenAI’s official frontend design guide documents a three-phase approach9:
flowchart LR
    A[Screenshot / Mockup] --> B[Codex CLI<br/>with -i flag]
    B --> C[Generated Code<br/>matching design system]
    C --> D[Playwright<br/>visual verification]
    D -->|Differences found| B
    D -->|Matches reference| E[Commit]
Phase 1: reference collection. Gather desktop and mobile layouts, interaction states (hover, loading, empty, error) and edge cases. The references need not be polished Figma deliverables. Annotated screenshots work.
Phase 2: design-system-aware generation. Point Codex at your existing component library:
codex -i mockup-desktop.png -i mockup-mobile.png \
  "Implement this design using our existing Tailwind tokens in tailwind.config.ts \
   and the component primitives in src/components/ui/. \
   Make it responsive. Use the project's data-fetching patterns."
Codex reads your design tokens, existing components and routing conventions before generating code. This avoids the common failure mode where AI-generated UI creates a parallel styling system that drifts from the existing codebase9.
Phase 3: visual verification with Playwright. The Playwright skill opens the application in a real browser, screenshots the result at multiple viewport widths and compares against your reference images:
codex "Open the app at localhost:3000/dashboard, screenshot it at 1440px and 375px \
       widths, and compare with the reference mockups. List layout differences."
Iterate until the implementation matches. Each round costs one image-input turn plus one text turn, materially cheaper than manual back-and-forth with a separate design tool.
Workflow 2: asset generation for frontend projects
For projects that need placeholder art, icons or illustrations, the $imagegen skill eliminates the Figma-to-export-to-commit cycle:
codex "$imagegen Generate a set of 6 monochrome line icons at 64x64: \
       home, settings, profile, notifications, search, logout. \
       White stroke on transparent background. 2px stroke width."
gpt-image-2 handles dense text rendering at greater than 99 per cent accuracy1, making it viable for generating labelled diagrams, annotated architecture visuals and placeholder marketing banners with real copy.
Batch generation pattern
For larger asset sets, use codex exec to script generation without interactive mode:
codex exec "Generate the following icons as individual PNGs at 128x128, \
  save each to ./public/icons/<name>.png: \
  dashboard, analytics, users, billing, support, integrations"
Set OPENAI_API_KEY when running batch generation to avoid exhausting included plan limits2. Note the 250 IPM rate limit; large batches may need pacing.
Workflow 3: Figma round-trip with MCP
The Figma MCP server exposes two tools to Codex: get_design_context (design-to-code) and generate_figma_design (code-to-canvas)10. Configure it in your MCP servers:
// .codex/config.json
{
  "mcpServers": {
    "figma": {
      "type": "url",
      "url": "https://figma-mcp.example.com/mcp"
    }
  }
}
The round-trip workflow:
flowchart TB
    A[Figma Frame] -->|get_design_context| B[Codex CLI]
    B --> C[Generated Code]
    C --> D[Running App]
    D -->|generate_figma_design| E[New Figma Frames]
    E --> F[Designer Review]
    F -->|Refined design| A
- Copy a Figma frame URL and paste it into Codex: ‘Implement this Figma design in code’.
- Codex calls
get_design_contextto extract layout, styles and component structure10. - After implementation, ask Codex to capture the running app back into Figma for designer review.
- Designers refine in Figma; the loop continues.
This eliminates the manual re-creation step that traditionally breaks the design-to-code feedback loop10. Note that only clients listed in the Figma MCP Catalogue can connect to the Figma MCP Server; check the Figma developer documentation for access.
Configuration reference
Key config.toml entries for image workflows:
# Disable image generation if not needed
[[skills.config]]
path = "imagegen"
enabled = false

# Configure Playwright for visual verification
# (add to .codex/config.json mcpServers instead)
// .codex/config.json
{
  "mcpServers": {
    "playwright": {
      "command": "npx",
      "args": ["-y", "@anthropic-ai/playwright-mcp"]
    }
  }
}
To disable the $imagegen skill without deleting it, add the [[skills.config]] entry and restart Codex8.
Limitations and caveats
No transparent PNG from gpt-image-2. The background=transparent parameter returns an error for gpt-image-27. Use the chroma-key workaround described above, or route transparency requests to gpt-image-1.5 (the skill asks before downgrading)8.
Rate limits. Standard accounts cap at 250 images per minute. New accounts start at five IPM6. Batch generation workflows need pacing.
Resolution stability. 4K output is available in beta but results become variable above 2,560 x 1,44063. For production assets, generate at 2K and upscale externally.
Cost multiplication. Image turns consume plan limits three to five times faster than text2. Teams running frequent visual iterations should budget accordingly or switch to API pricing.
DALL-E 3 is gone. Both DALL-E 2 and DALL-E 3 were deprecated on 12 May 20263. Any existing workflows that reference dall-e-3 as a model ID will fail.
CLI vs desktop app. The Codex desktop app offers an in-app browser for direct visual annotation11. The CLI workflow requires the Playwright MCP bridge for equivalent browser-based verification, functional but less fluid for purely visual iteration.
When to use this
Image generation in Codex CLI is most valuable when:
- You need rapid UI prototypes from sketches or screenshots and want to stay in the terminal
- Your team generates placeholder assets (icons, banners, diagrams) as part of the development workflow
- You run a Figma round-trip process and want to automate the code-to-canvas step
- You need text-heavy generated images (diagrams, infographics) where gpt-image-2’s greater than 99 per cent text accuracy matters
It is not a replacement for professional graphic design tools for brand-critical assets, nor for pixel-perfect production art at resolutions above 2K. For transparent PNGs, the chroma-key workaround works for prototyping but a vector workflow remains cleaner for production icon sets.
Citations
-
OpenAI, ‘Introducing gpt-image-2, available today in the API and Codex,’ OpenAI Developer Community, 21 April 2026. https://community.openai.com/t/introducing-gpt-image-2-available-today-in-the-api-and-codex/1379479 ↩ ↩2 ↩3 ↩4 ↩5
-
OpenAI, ‘Features, Codex CLI,’ OpenAI Developers, accessed 27 April 2026. https://developers.openai.com/codex/cli/features ↩ ↩2 ↩3 ↩4 ↩5
-
MindWired AI, ‘GPT Image 2: Complete Guide, API Live, DALL-E 3 Retired, 4K Added,’ updated May 2026. https://mindwiredai.com/2026/04/22/what-is-gpt-image-2-the-complete-breakdown-features-pricing-and-who-gets-access/ ↩ ↩2 ↩3 ↩4 ↩5
-
D. Vaughan, ‘Working with Images in Codex CLI: Attaching, Inspecting and Generating Visual Assets,’ Codex Blog, 28 March 2026. https://codex.danielvaughan.com/2026/03/28/codex-cli-image-workflows/ ↩
-
AI Free Forever, ‘GPT-Image 2 vs GPT Image 1.5 full comparison 2026,’ accessed 27 April 2026. https://aifreeforever.com/blog/gpt-image-2-vs-gpt-image-1-5 ↩ ↩2
-
OpenAI, ‘GPT Image 2 Model,’ OpenAI API Docs, accessed 27 April 2026. https://developers.openai.com/api/docs/models/gpt-image-2 ↩ ↩2 ↩3 ↩4 ↩5 ↩6 ↩7
-
Apiyi.com, ‘In-depth test: GPT-Image-2 transparent background failure: alternatives and root causes,’ 2026. https://help.apiyi.com/en/gpt-image-2-transparent-background-not-supported-en.html ↩ ↩2 ↩3
-
OpenAI, ‘Agent Skills, Codex,’ OpenAI Developers, accessed 27 April 2026. https://developers.openai.com/codex/skills. See also the full skill source: https://github.com/openai/codex/blob/main/codex-rs/skills/src/assets/samples/imagegen/SKILL.md ↩ ↩2 ↩3 ↩4 ↩5 ↩6 ↩7
-
OpenAI, ‘Build responsive front-end designs,’ Codex Use Cases, accessed 27 April 2026. https://developers.openai.com/codex/use-cases/frontend-designs ↩ ↩2
-
OpenAI, ‘Building Frontend UIs with Codex and Figma,’ OpenAI Developer Blog, April 2026. https://developers.openai.com/blog/building-frontend-uis-with-codex-and-figma. See also Figma MCP server documentation: https://developers.figma.com/docs/figma-mcp-server/ ↩ ↩2 ↩3
-
OpenAI, ‘Codex for (almost) everything,’ OpenAI Blog, 16 April 2026. https://openai.com/index/codex-for-almost-everything/ ↩