Terminal-Native Codex CLI Workflows: Neovim, tmux, and the Multiplexer-Driven Development Stack
Terminal-Native Codex CLI Workflows: Neovim, tmux, and the Multiplexer-Driven Development Stack
Codex CLI runs in a terminal. Neovim runs in a terminal. tmux multiplexes terminals. The logical conclusion — a fully keyboard-driven development environment where your editor, your agent, and your orchestration layer share a single session — has quietly become the dominant workflow pattern among terminal-native developers in 202612.
This article maps the ecosystem of Neovim plugins, tmux session managers, and orchestration tools that turn Codex CLI from a standalone agent into an integrated component of a terminal-native development stack.
Why Terminal-Native Matters for Codex CLI
IDE extensions wrap Codex in a GUI. The terminal-native approach takes the opposite path: Codex CLI stays in its natural habitat — a terminal pane — while the editor and multiplexer provide the integration glue3.
The advantages compound:
- Zero context switch — your editor, agent, and shell share a single viewport
- Session persistence — tmux sessions survive SSH disconnects, reboots, and lunch breaks
- Parallel agents — each tmux pane can run an independent Codex instance against a separate git worktree4
- Scriptability — tmux
send-keysenables programmatic interaction with Codex from any process - Resource efficiency — no Electron, no browser runtime, no WebSocket overhead
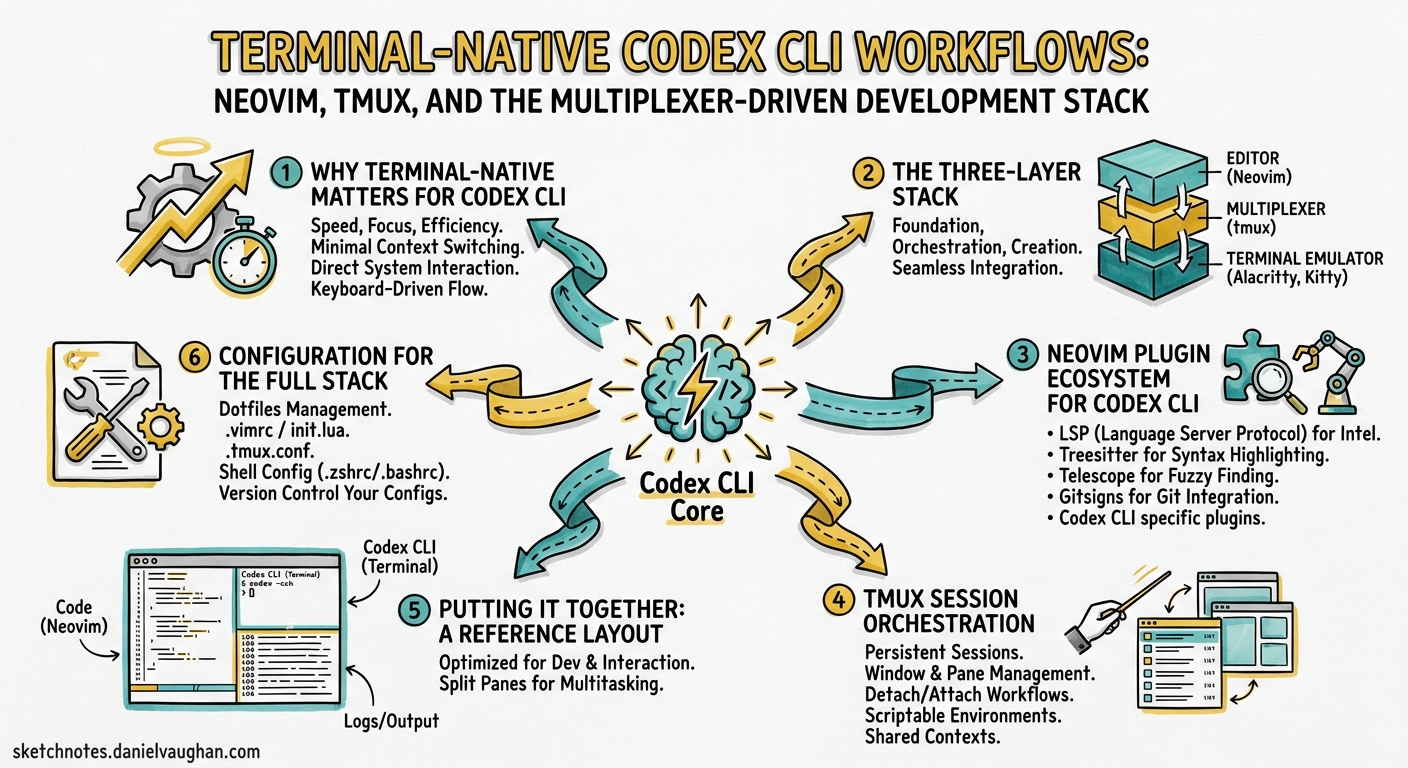
The Three-Layer Stack
graph TD
    A[Terminal Emulator<br/>Ghostty / Kitty / WezTerm] --> B[Terminal Multiplexer<br/>tmux / zellij]
    B --> C1[Pane: Neovim + codex.nvim]
    B --> C2[Pane: Codex CLI Instance 1]
    B --> C3[Pane: Codex CLI Instance 2]
    B --> C4[Pane: Shell / Tests / Logs]
    C1 -->|send-keys / selection| C2
    C1 -->|send-keys / selection| C3
    style A fill:#1a1a2e,color:#e0e0e0
    style B fill:#16213e,color:#e0e0e0
    style C1 fill:#0f3460,color:#e0e0e0
    style C2 fill:#533483,color:#e0e0e0
    style C3 fill:#533483,color:#e0e0e0
    style C4 fill:#2b2d42,color:#e0e0e0
Layer 1: Terminal Emulator
Codex CLI generates substantial output during long sessions. Your terminal emulator needs to handle high-throughput rendering without dropping frames. In 2026, the three serious contenders for AI CLI work are Ghostty, Kitty, and WezTerm5.
| Feature | Ghostty | Kitty | WezTerm |
|---|---|---|---|
| Rendering throughput | Highest (2–5× WezTerm)5 | High | Moderate |
| Kitty image protocol | Yes | Yes | Yes |
| Sixel images | No | No | Yes |
| Shift+Enter passthrough | Native | Native | Native |
| Desktop notifications | Native | Native | Via plugin |
| GPU acceleration | Yes | Yes | Yes |
For Codex CLI specifically, Ghostty’s rendering performance matters when agents produce long diffs. WezTerm’s broader graphics protocol support matters if you use image-aware MCP servers5.
Layer 2: Terminal Multiplexer
tmux remains the default for Codex CLI workflows because of its mature send-keys API, which every Neovim plugin in this space depends on6. zellij is supported by sidekick.nvim but lacks the send-keys equivalent that makes programmatic agent interaction possible7.
A minimal tmux configuration for Codex CLI work:
# ~/.tmux.conf additions for Codex CLI workflows
set -g mouse on
set -g history-limit 50000          # Codex sessions produce long output
set -g default-terminal "tmux-256color"
set -ag terminal-overrides ",*:RGB"  # True colour for diffs

# Quick pane navigation
bind -n M-h select-pane -L
bind -n M-l select-pane -R
bind -n M-k select-pane -U
bind -n M-j select-pane -D

# Resize panes for Codex output
bind -n M-H resize-pane -L 5
bind -n M-L resize-pane -R 5
Layer 3: Editor + Agent Plugins
This is where the integration happens. Four Neovim plugins currently bridge the editor-agent gap.
Neovim Plugin Ecosystem for Codex CLI
codex.nvim (rhart92)
The most focused option. It opens Codex CLI in a dedicated terminal split or float and provides a send_selection action for piping visual selections directly into the agent8.
-- lazy.nvim setup
{
  "rhart92/codex.nvim",
  config = function()
    require("codex").setup({
      split = "vertical",     -- "horizontal", "vertical", or "float"
      size = 0.4,             -- 40% of the window
      focus_after_send = false, -- keep cursor in editor
      autostart = true,       -- start Codex in background
    })
  end,
  keys = {
    { "<leader>cc", function() require("codex").toggle() end, desc = "Toggle Codex" },
    { "<leader>cs", function() require("codex").actions.send_selection() end, mode = "v", desc = "Send to Codex" },
  },
}
The workflow: select a function in visual mode, press <leader>cs, and the selection arrives in the Codex CLI pane as context. Codex can then edit the file directly, and Neovim’s autoread picks up the changes8.
codex-cli.nvim (dukjjang)
Takes a different approach: it detects an existing tmux pane running Codex CLI and sends prompts to it via tmux send-keys. If no Codex pane exists, it falls back to an embedded terminal split9.
{
  "dukjjang/codex-cli.nvim",
  config = function()
    require("codex_cli").setup()
  end,
}
Default keybindings9:
<leader>aa(normal mode) — prompt with current file as context<leader>aa(visual mode) — prompt with selected line range as context<leader>at— toggle terminal
The tmux detection is the key differentiator. If you already have a tmux session with a dedicated Codex pane, codex-cli.nvim finds it and sends prompts there rather than spawning a new instance. This fits naturally into the multiplexer-first workflow9.
sidekick.nvim (folke)
The most ambitious option. It combines Copilot’s Next Edit Suggestions with an integrated terminal for any AI CLI tool — Claude Code, Gemini CLI, Grok Build, and Codex CLI are all pre-configured7.
{
  "folke/sidekick.nvim",
  config = function()
    require("sidekick").setup({
      tools = {
        codex = { enabled = true },
      },
      window = { position = "right" },
      mux = "tmux",  -- or "zellij" for session persistence
    })
  end,
}
sidekick.nvim adds context-aware prompts that include file content, cursor position, and LSP diagnostics. Its prompt library provides templates for common tasks (explain, refactor, test, review). The tmux/zellij backend ensures sessions persist across editor restarts7.
For teams running multiple coding agents, sidekick.nvim is the natural choice — you can switch between Codex CLI and Claude Code in the same terminal pane without reconfiguring7.
tmux Session Orchestration
Running a single Codex pane alongside Neovim is the starting point. The real power emerges when you orchestrate multiple agents across tmux panes.
codex-cli-farm
A Bash-based session manager purpose-built for running multiple Codex CLI instances10:
# Install
source ./setup.sh

# Add instances targeting different worktrees
codex-add work ~/project/worktree-auth
codex-add work ~/project/worktree-api
codex-add work ~/project/worktree-tests

# Monitor all instances
codex-watch

# Save and restore across reboots
codex-save
codex-restore -a
Each instance gets its own timestamped log file. The codex-watch command tails all logs simultaneously via multitail. Window title annotations show RUN/READY/ERR status at a glance10.
codex-cli-farm also provides equivalent claude-* and gemini-* commands, making it agent-agnostic. The systemd integration enables hourly autosave and login-time restore for truly persistent agent farms10.
Named Tmux Manager (ntm)
A Go-based control plane that elevates tmux from a terminal multiplexer to a multi-agent orchestration system11. Where codex-cli-farm manages sessions, ntm manages workflows:
# Spawn a mixed-agent session
ntm spawn api --cc=2 --cod=1 --gmi=1

# Broadcast a prompt to all Codex instances
ntm send --type cod "Refactor the auth middleware to use JWT"

# Live dashboard
ntm dashboard

# Checkpoint and restore
ntm checkpoint save pre-refactor
ntm checkpoint restore pre-refactor
ntm adds safety policies, approval workflows, file reservation (lock) management, and audit trails11. The ntm work triage command integrates with dependency graphs to suggest which agent should tackle which task. The REST/WebSocket API (ntm serve) enables external tooling to interact with the agent swarm programmatically11.
sequenceDiagram
    participant Op as Operator
    participant NTM as ntm Control Plane
    participant T as tmux Session
    participant C1 as Codex Agent 1
    participant C2 as Codex Agent 2

    Op->>NTM: ntm spawn api --cod=2
    NTM->>T: Create session with 2 panes
    T->>C1: Launch codex in worktree-1
    T->>C2: Launch codex in worktree-2
    Op->>NTM: ntm send --type cod "Fix auth bug"
    NTM->>T: send-keys to both panes
    T->>C1: Receives prompt
    T->>C2: Receives prompt
    C1-->>T: Working...
    C2-->>T: Working...
    Op->>NTM: ntm dashboard
    NTM-->>Op: Live status of both agents
    Op->>NTM: ntm checkpoint save
    NTM->>T: Snapshot session state
Putting It Together: A Reference Layout
Here is a practical tmux layout for a senior developer working on a feature branch with Codex CLI assistance:
#!/usr/bin/env bash
# codex-dev-session.sh — spin up a terminal-native Codex workspace

SESSION="codex-dev"
PROJECT="$HOME/project"

tmux new-session -d -s "$SESSION" -c "$PROJECT"

# Pane 0: Neovim (main editor)
tmux send-keys -t "$SESSION" "nvim" Enter

# Pane 1: Codex CLI (agent)
tmux split-window -h -t "$SESSION" -c "$PROJECT"
tmux send-keys -t "$SESSION" "codex" Enter

# Pane 2: Shell (tests, git, builds)
tmux split-window -v -t "$SESSION" -c "$PROJECT"

# Pane 3: Codex watch / logs
tmux split-window -v -t "$SESSION:0.1" -c "$PROJECT"
tmux send-keys -t "$SESSION" "git log --oneline -20" Enter

# Set layout: editor left, agent top-right, shell bottom-right
tmux select-layout -t "$SESSION" main-vertical

tmux attach -t "$SESSION"
Workflow Patterns
Pattern 1: Select-and-Send — Highlight code in Neovim, send to Codex via codex.nvim or codex-cli.nvim. Codex edits the file. Neovim’s autoread reloads it. Review the diff with :Gvdiffsplit89.
Pattern 2: Parallel Worktrees — Assign each Codex pane a separate git worktree. One agent works on the API, another on tests, a third on documentation. Merge results after all agents complete410.
Pattern 3: Agent + Test Loop — Codex runs in one pane, a continuous test runner (cargo watch, jest --watch, pytest-watch) in another. Codex edits code; the test pane provides immediate feedback. Wire a PostToolUse hook to echo test results back3.
Pattern 4: Remote Pair Programming — SSH into a development machine, attach to a tmux session, and interact with a Codex agent that has been running for hours. mosh support in codex-cli-farm handles unreliable connections10.
Configuration for the Full Stack
Codex CLI config.toml
Ensure Codex CLI plays well with the terminal stack:
# ~/.codex/config.toml

[features]
memories = true
voice_transcription = false  # not needed in tmux workflows

[history]
persistence = "full"
max_conversations = 100

[model]
default = "gpt-5.5"
Neovim Autoread
Critical for the select-and-send pattern — Codex edits files outside Neovim, so the editor must reload:
-- init.lua
vim.o.autoread = true
vim.api.nvim_create_autocmd({ "FocusGained", "BufEnter", "CursorHold" }, {
  command = "checktime",
})
Trade-Offs and Limitations
Learning curve — the tmux + Neovim + Codex triple requires fluency in all three tools. This is not a beginner workflow1.
No GUI diff review — terminal-based diffs via delta or difftastic are good but lack the interactive staging of VS Code’s built-in diff viewer. Neovim’s Fugitive plugin partially closes this gap.
Agent output scrollback — long Codex sessions can exceed tmux’s history-limit. Set it to 50,000+ lines or pipe agent output to log files via codex-cli-farm10.
Image limitations — Codex CLI can attach images, but terminal image protocol support varies. Ghostty and Kitty handle the Kitty protocol; WezTerm adds Sixel. iTerm2 users get the iTerm protocol. If your workflow involves screenshot-to-code, verify your terminal supports inline images5.
Session state vs. Codex state — tmux saves window/pane layout, not Codex conversation history. Use codex exec resume --last or the app-server sync to carry conversation context across restarts3.
When to Use This Stack
| Scenario | Recommended? |
|---|---|
| Solo developer, single feature branch | Yes — select-and-send is fast |
| Parallel feature development (3–8 agents) | Yes — tmux + worktrees shine here |
| Enterprise team with shared standards | Consider — ntm adds governance |
| Occasional Codex user | Overkill — VS Code extension is simpler |
| Remote/SSH development | Strongly yes — tmux persistence is essential |
| Pair programming with voice | Partial — add Codex voice transcription if needed |
Citations
-
I Switched to Neovim + Tmux for AI Coding Agents — YouTube ↩ ↩2
-
My Terminal Setup in 2026: Ghostty, tmux, and Neovim — Nick Liu ↩
-
Parallel Coding Agents with Git Worktree × tmux — Sho Ito, Medium ↩ ↩2
-
Ghostty vs Warp 2.0 vs WezTerm: Best Terminal for AI CLI in 2026 — Termdock ↩ ↩2 ↩3 ↩4
-
Named Tmux Manager (ntm) — GitHub (Dicklesworthstone) ↩ ↩2 ↩3