Your First 30 Minutes with Codex CLI: From Install to First Fix
Your First 30 Minutes with Codex CLI: From Install to First Fix
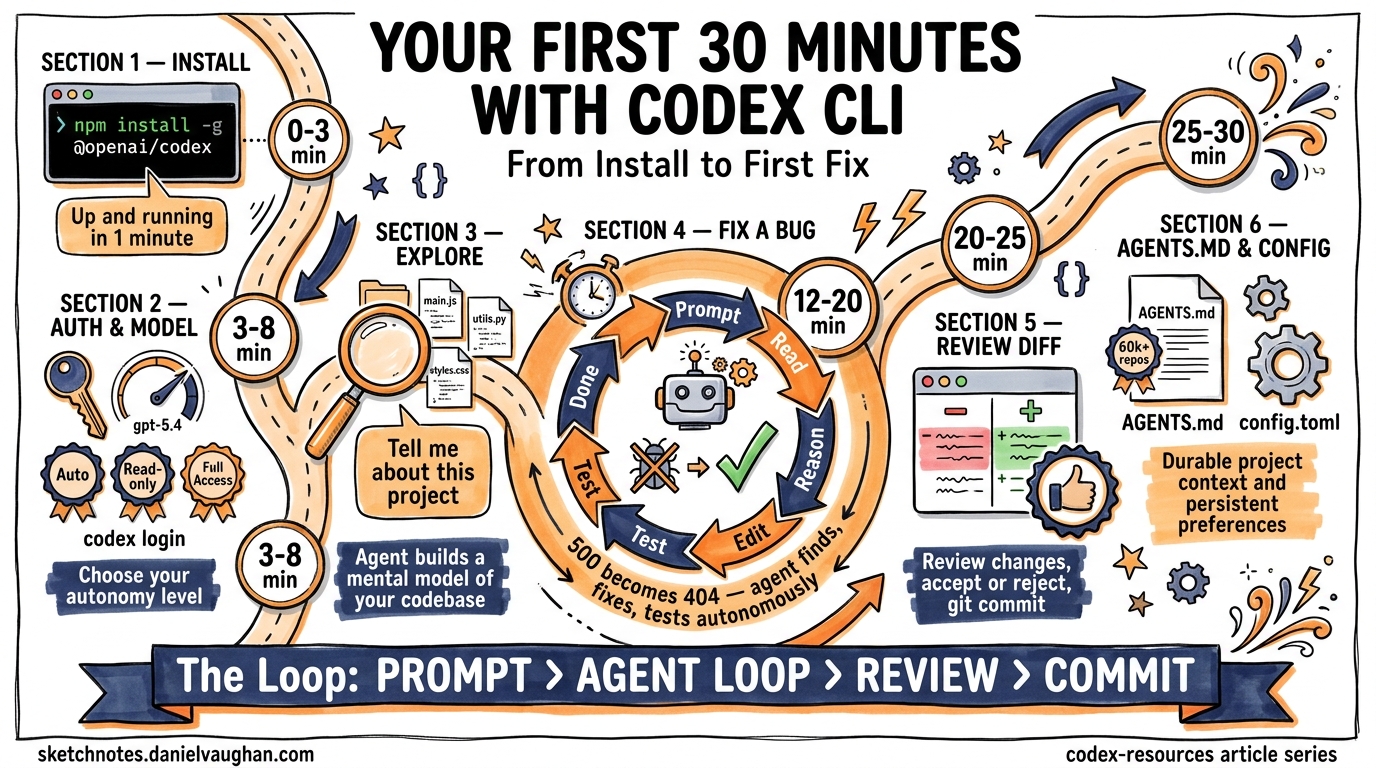
Thirty minutes. That is all you need to go from zero to watching an AI agent autonomously diagnose a bug, write a fix, run the tests, and present you with a clean diff. This article walks through that experience step by step—no hand-waving, no hypotheticals. You will install the CLI, point it at a real repository, feed it a real bug, and watch the agent loop do its thing.
Prerequisites
Before you start the clock, make sure you have:
- Node.js 22+ installed (required for the npm package)1
- A ChatGPT account or an OpenAI API key2
- A Git repository with a codebase you want to work on
- A terminal emulator (iTerm2, Warp, Windows Terminal, or any modern equivalent)
If you are on Windows, OpenAI recommends running Codex inside WSL for the most stable experience3.
Minute 0–3: Installation
Two package managers can get you running in under a minute:
# Via npm (cross-platform)
npm install -g @openai/codex

# Via Homebrew (macOS/Linux)
brew install codex
Verify the install:
codex --version
You can also download a standalone binary from the GitHub releases page if you prefer not to use a package manager1.
Minute 3–5: Authentication
Run codex for the first time and you will be prompted to authenticate:
codex login
You can sign in with your ChatGPT account via OAuth or paste an API key directly2. If you already have OPENAI_API_KEY set in your environment, the CLI picks it up automatically.
Minute 5–8: Choose Your Model and Approval Mode
Codex CLI defaults to gpt-5.4, which is the recommended model for most coding tasks4. For lighter work or when cost matters, switch to gpt-5.4-mini:
codex --model gpt-5.4-mini
Three approval modes control how much autonomy the agent has5:
| Mode | Flag | Behaviour |
|---|---|---|
| Auto (default) | -a on-request |
Reads, edits, and runs commands in the working directory; asks before anything external |
| Read-only | -s read-only |
Browses files but asks before making changes |
| Full Access | -s danger-full-access |
Unrestricted—use only in disposable environments |
For your first session, stick with the default. You want to see the agent work, but you also want a safety net.
Minute 8–12: Point Codex at a Repository
Navigate to a Git repository you know well:
cd ~/projects/my-api
codex
The full-screen terminal UI (TUI) launches. Start with an orientation prompt:
Tell me about this project
The agent reads your directory structure, inspects key files (package.json, README.md, AGENTS.md if present), and returns a summary. This is the agent’s context-gathering phase—it builds a mental model of your codebase before doing anything6.
Minute 12–20: Feed It a Real Bug
Now for the interesting part. Give Codex a concrete task with a clear success criterion. The more specific your prompt, the better the result7:
The endpoint GET /api/users/:id returns a 500 when the user ID
doesn't exist in the database. It should return a 404 with a
JSON error body. Fix this and make sure the existing tests pass.
What Happens Next: The Agent Loop
Once you hit Enter, the agent enters its execution loop. Here is what unfolds:
sequenceDiagram
    participant You
    participant TUI as Codex TUI
    participant LLM as gpt-5.4
    participant Tools as Sandbox Tools

    You->>TUI: Submit prompt
    TUI->>LLM: Prompt + repo context

    loop Agent Inner Loop
        LLM->>Tools: Read file (e.g. routes/users.js)
        Tools-->>LLM: File contents
        LLM->>LLM: Reason about the bug
        LLM->>Tools: Edit file (add 404 handling)
        Tools-->>LLM: Edit confirmed
        LLM->>Tools: Run command (npm test)
        Tools-->>LLM: Test output
        LLM->>LLM: Evaluate results
    end

    LLM-->>TUI: Present diff + summary
    TUI-->>You: Review changes
The LLM generates a stream of output events. Some are tool calls (read a file, edit a file, run a command), and some are reasoning steps (planning the fix, evaluating test output). Both are appended to the conversation context and fed back into the model for the next iteration—this is a single turn of the inner loop8.
The loop continues until the model emits a done event, indicating it believes the task is complete. Prompt caching keeps inference performance linear rather than quadratic as the conversation grows8.
Watching It Work
In the TUI, you will see each step in real time:
- File discovery — The agent locates the relevant route handler
- Code reading — It reads the current implementation
- Reasoning — It identifies the missing null check
- Editing — It adds the 404 response path
- Testing — It runs your test suite to verify the fix
- Summary — It presents the diff and explains what changed
If you are in the default approval mode, the agent may pause to ask permission before running commands. Approve with a keypress and it continues.
Minute 20–25: Review the Diff
Once the agent finishes, review the changes directly in the TUI. You can:
- Accept the changes and they are written to your working tree
- Reject individual edits if something looks wrong
- Copy the response with
Ctrl+Ofor pasting elsewhere9
The diff is a standard Git diff. If you want to inspect it further:
git diff
If you are happy with the fix, commit it:
git add -p  # Stage selectively
git commit -m "fix: return 404 for missing user instead of 500"
Minute 25–28: Set Up AGENTS.md
Before you close the session, invest two minutes in creating an AGENTS.md file at the root of your repository. This file auto-loads on every Codex session and gives the agent durable context about your project10:
codex /init
This scaffolds a starter file. Edit it to include the essentials:
# AGENTS.md

## Repository layout
- `src/` — Application source code (TypeScript)
- `tests/` — Jest test suite
- `docs/` — API documentation

## Build and test
- `npm run build` — Compile TypeScript
- `npm test` — Run all tests
- `npm run lint` — ESLint check

## Conventions
- All API endpoints return JSON error bodies with `{ error: string }`
- Use early returns for error handling
- Every new endpoint needs a corresponding test file
Keep it short and practical. Vague rules like “write clean code” waste tokens—be specific or leave it out10. The AGENTS.md format is now an open standard stewarded by the Linux Foundation, adopted by over 60,000 open-source projects11.
Minute 28–30: Persist Your Preferences
Store your preferred defaults in ~/.codex/config.toml so every session starts the way you want12:
model = "gpt-5.4"

[approvals]
ask-for-approval = "on-request"

[sandbox]
mode = "workspace-write"
Project-specific overrides go in .codex/config.toml at the repository root.
What You Just Did
In 30 minutes you:
- Installed the CLI and authenticated
- Explored a codebase through natural language
- Fixed a real bug with the agent loop handling file discovery, editing, and testing autonomously
- Set up
AGENTS.mdfor durable project context - Configured persistent preferences
You did not write a single line of application code yourself. The agent did the implementation; you directed the work and reviewed the result.
Where to Go Next
| Next step | Command or resource |
|---|---|
| Resume this session later | codex resume or /resume in the TUI13 |
| Review a branch before merging | /review in the TUI5 |
| Run Codex non-interactively in CI | codex exec "run the linter and fix issues" 14 |
| Add MCP integrations | codex mcp add <server> 5 |
| Try a planning workflow | Start your prompt with /plan 7 |
The first 30 minutes are about building intuition for the feedback loop: prompt → agent loop → review → commit. Once that loop feels natural, everything else—subagents, MCP servers, CI automation—is just configuration on top of the same pattern.