Before and After: 5 Developer Workflows Transformed by Codex CLI
Before and After: 5 Developer Workflows Transformed by Codex CLI
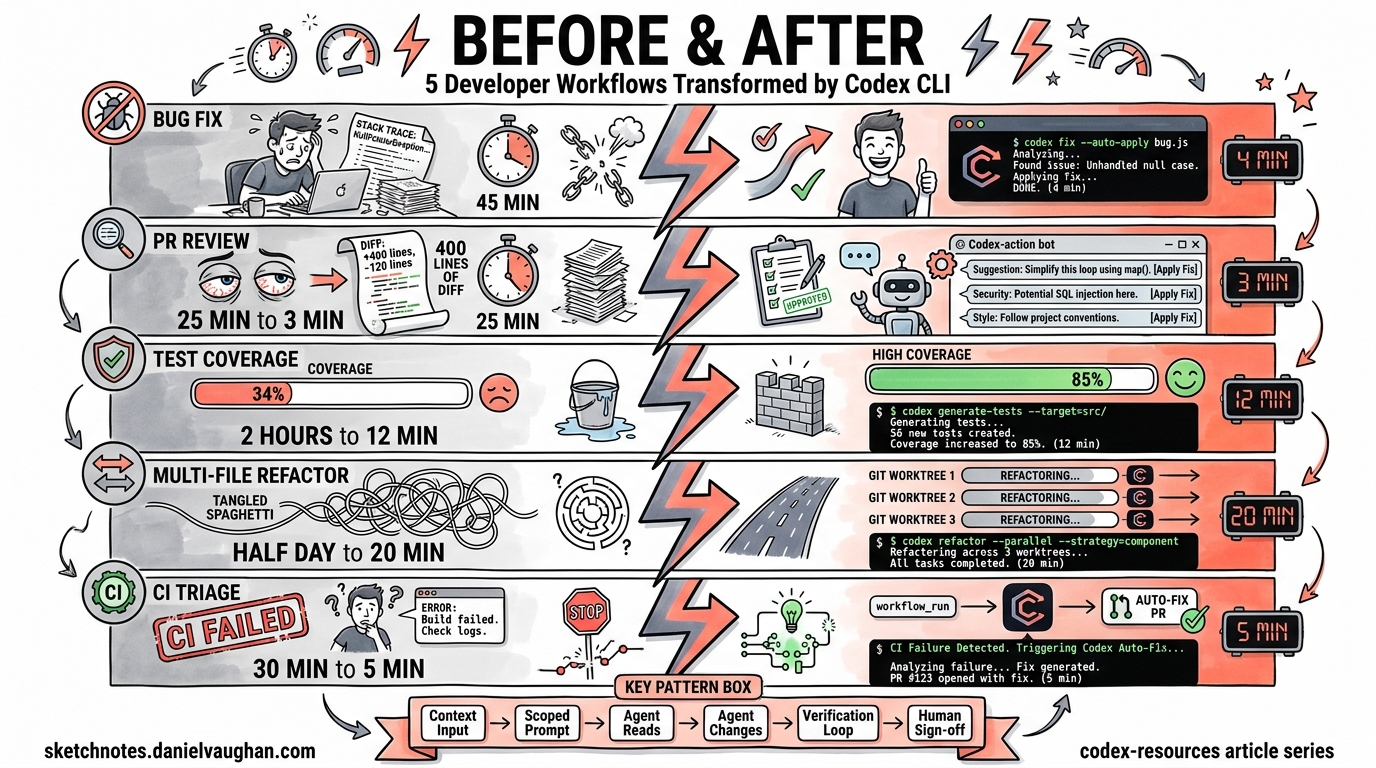
Every developer has workflows they endure rather than enjoy — the 45-minute bug-fix cycle, the mind-numbing PR review backlog, the test coverage debt that never quite gets addressed. Codex CLI transforms these workflows from manual slogs into agent-assisted operations that finish in a fraction of the time.
This article presents five side-by-side comparisons of manual versus agentic workflows, each with specific commands, realistic timings, and the architectural patterns that make them work.
1. Bug Fix from Error Alert — 45 Minutes → 4 Minutes
Before: The Manual Cycle
A Sentry alert fires at 09:12. You open the dashboard, read the stack trace, locate the offending file, reproduce the issue locally, write a fix, run tests, and open a PR. Even for a straightforward null-pointer guard, this ritual rarely takes fewer than 40 minutes.
After: Agent-Assisted Fix
# Pipe the error context directly to Codex
tail -n 200 /tmp/sentry-export.log \
  | codex exec "Diagnose the root cause from this error log. \
    Apply a minimal fix and add a regression test. \
    Do not refactor unrelated code." \
    --full-auto
Codex reads the stack trace, navigates to the relevant source files, applies a targeted patch, writes a regression test, and runs the test suite to verify the fix1. The --full-auto flag combines on-request approvals with workspace-write sandbox access, giving the agent enough autonomy for low-risk local fixes2.
Time breakdown:
| Phase | Manual | Agentic |
|---|---|---|
| Triage and locate | 15 min | ~30 sec |
| Reproduce | 10 min | Automatic |
| Write fix + test | 15 min | ~2 min |
| Run tests | 5 min | ~1 min |
| Total | ~45 min | ~4 min |
The key insight: Codex’s “tight loop with reproduction and verification” means it discovers the failing code path, proposes a patch, and re-runs the test suite iteratively until everything passes3.
2. PR Code Review — 25 Minutes → 3 Minutes
Before: The Manual Review
You open the PR, read through 400 lines of diff across eight files, cross-reference the ticket, check for edge cases, verify naming conventions, look for security issues, and leave inline comments. A thorough review of a medium-sized PR typically takes 20–30 minutes.
After: Automated Review with codex-action
# .github/workflows/codex-review.yml
name: Codex PR Review
on:
  pull_request:
    types: [opened, synchronize, reopened]

jobs:
  review:
    runs-on: ubuntu-latest
    permissions:
      contents: read
      pull-requests: write
    steps:
      - uses: actions/checkout@v5
        with:
          ref: refs/pull/${{ github.event.pull_request.number }}/merge

      - name: Run Codex Review
        uses: openai/codex-action@v1
        with:
          openai-api-key: ${{ secrets.OPENAI_API_KEY }}
          prompt-file: .github/codex/prompts/review.md
          output-file: codex-output.md
          safety-strategy: drop-sudo
          sandbox: read-only
The openai/codex-action@v1 installs the Codex CLI, starts the Responses API proxy, and runs codex exec with the permissions you specify4. The drop-sudo safety strategy irreversibly removes sudo capability, preventing the agent from accessing its own API key — critical for public repositories5.
Your review prompt file (.github/codex/prompts/review.md) can focus on what matters:
Review this pull request. Focus on:
1. Logic errors and edge cases
2. Security vulnerabilities (injection, auth bypass, data exposure)
3. Performance regressions
4. API contract changes
Post findings as inline PR comments, prioritised by severity.
The agent reads the full diff, analyses control flow, and posts prioritised, actionable findings without touching the working tree6. You still do the final sign-off — but now you’re reviewing the agent’s findings rather than scanning raw diffs.
3. Test Coverage Gap — 2 Hours → 12 Minutes
Before: The Manual Grind
Your coverage report shows src/services/billing.ts at 34%. You spend two hours writing 15 test cases: happy paths, edge cases, error conditions, mock setups. It’s valuable work, but it’s also the kind of work that gets perpetually deprioritised.
After: Targeted Test Generation
codex exec "Analyse src/services/billing.ts. Write comprehensive tests \
  covering happy path, edge cases, error handling, and boundary \
  conditions. Target 85% branch coverage. Use the existing test \
  framework and patterns from tests/services/." \
  --full-auto
Codex reads the source file, infers testable units, identifies critical code paths, determines edge cases, creates realistic test data, and writes tests to the appropriate location7. Crucially, it executes the tests it creates and iterates until they pass — ensuring generated tests are both syntactically correct and functionally effective8.
For CI integration, pipe structured output for downstream processing:
codex exec --json \
  "Generate missing tests for all files below 60% coverage \
   in the coverage report at coverage/lcov.info" \
  -o test-gen-results.json
The --json flag emits newline-delimited JSON events, whilst --output-last-message (-o) writes the final response to a file for downstream automation2.
Realistic expectations: The agent handles straightforward unit tests brilliantly. Complex integration tests with intricate state management still benefit from human design, but the boilerplate and repetitive case generation — the bit that takes the longest — is fully automated.
4. Multi-File Refactor — Half a Day → 20 Minutes
Before: The Manual Refactor
Renaming a core interface that’s referenced across 47 files, updating type signatures, fixing downstream consumers, and ensuring nothing breaks. Even with IDE tooling, a cross-cutting refactor in a large TypeScript or Java codebase easily consumes half a day when you factor in test updates and integration verification.
After: Parallel Agents via Git Worktrees
Git worktrees give each agent an isolated copy of your repository sharing the same history but checked out to its own directory9. This is how you run multiple refactoring tasks in parallel without agents interfering with each other.
# Terminal 1: Rename the interface and update type signatures
git worktree add ../refactor-types feature/rename-types
cd ../refactor-types
codex exec "Rename the PaymentProvider interface to BillingGateway \
  across the entire codebase. Update all type signatures, imports, \
  and documentation references. Run the type checker after changes." \
  --full-auto

# Terminal 2: Update all tests referencing the old name
git worktree add ../refactor-tests feature/rename-tests
cd ../refactor-tests
codex exec "Update all test files to use BillingGateway instead of \
  PaymentProvider. Ensure all mocks and fixtures are updated. \
  Run the full test suite." \
  --full-auto

# Terminal 3: Update API documentation and OpenAPI specs
git worktree add ../refactor-docs feature/rename-docs
cd ../refactor-docs
codex exec "Update all API documentation, OpenAPI specs, and README \
  files to reference BillingGateway instead of PaymentProvider." \
  --full-auto
Each agent operates on its own worktree, so Agent A can be refactoring your type signatures whilst Agent B updates tests, and neither touches the other’s files10. When all three finish, you merge the branches sequentially, resolving any minimal conflicts.
graph LR
    A[Main Branch] --> B[Worktree 1: Types]
    A --> C[Worktree 2: Tests]
    A --> D[Worktree 3: Docs]
    B --> E[Merge Back]
    C --> E
    D --> E
    E --> F[Verified Main]
The Codex desktop app automates worktree creation — each agent thread gets its own worktree automatically11. On the CLI, you manage worktrees manually with standard git worktree commands, but the pattern is identical.
5. CI Failure Triage — 30 Minutes → 5 Minutes
Before: The Manual Triage
CI goes red on a colleague’s branch. You pull it locally, read 200 lines of test output, identify which test failed, work out whether it’s a genuine regression or a flaky test, find the root cause, and either fix it or flag it. The context-switching alone costs 10 minutes before you even start diagnosing.
After: Automated Diagnosis and Fix
The most powerful pattern uses workflow_run to react to CI failures automatically12:
# .github/workflows/autofix.yml
name: Codex Autofix
on:
  workflow_run:
    workflows: ["CI"]
    types: [completed]

jobs:
  autofix:
    if: ${{ github.event.workflow_run.conclusion == 'failure' }}
    runs-on: ubuntu-latest
    permissions:
      contents: write
      pull-requests: write
    steps:
      - uses: actions/checkout@v5
        with:
          ref: ${{ github.event.workflow_run.head_sha }}

      - name: Diagnose and Fix
        uses: openai/codex-action@v1
        with:
          openai-api-key: ${{ secrets.OPENAI_API_KEY }}
          prompt: |
            The CI workflow failed on this commit. Diagnose the
            failure from the test output. Apply a minimal fix and
            verify the tests pass. Do not refactor unrelated code.
          sandbox: workspace-write
          safety-strategy: drop-sudo
When the CI workflow completes with a failure, this workflow triggers automatically. Codex checks out the failing commit, reads the test output, diagnoses the root cause, applies a minimal fix, re-runs the tests to verify, and opens a PR with the resulting patch12.
sequenceDiagram
    participant Dev as Developer
    participant CI as CI Pipeline
    participant Codex as Codex Agent
    participant PR as Pull Request

    Dev->>CI: Push commit
    CI->>CI: Run tests
    CI-->>Codex: workflow_run (failure)
    Codex->>Codex: Checkout failing SHA
    Codex->>Codex: Read test output
    Codex->>Codex: Diagnose root cause
    Codex->>Codex: Apply minimal fix
    Codex->>Codex: Re-run tests (verify)
    Codex->>PR: Open fix PR
    PR-->>Dev: Review and merge
What this doesn’t replace: Flaky test investigation, architectural issues causing cascading failures, and environment-specific problems still need human judgement. The agent excels at the mechanical parts — reading logs, locating the failing assertion, and applying a straightforward fix.
The Pattern Behind the Transformation
All five workflows share a common structure:
flowchart TD
    A[Context Input] --> B[codex exec with scoped prompt]
    B --> C[Agent reads relevant files]
    C --> D[Agent applies changes]
    D --> E[Agent verifies via tests/linting]
    E -->|Pass| F[Output: diff, PR, or report]
    E -->|Fail| D
The recurring principles:
- Scoped prompts — Tell the agent exactly what to do and what not to do. “Do not refactor unrelated code” prevents scope creep.
- Appropriate sandbox levels — Use
read-onlyfor analysis tasks,workspace-writefor fix-and-verify loops, and reservedanger-full-accessfor hardened, isolated environments only2. - Verification loops — Codex re-runs tests after making changes. This iterative loop is what separates agent-assisted development from copy-paste AI suggestions3.
- Human sign-off — Every workflow ends with a human reviewing the output. The agent handles the mechanical work; you handle the judgement calls.
Getting Started
If you’re new to Codex CLI, start with Workflow 1 (bug fix). It’s the lowest-risk, highest-reward entry point:
# Install Codex CLI
npm install -g @openai/codex

# Set your API key
export CODEX_API_KEY="sk-..."

# Try a simple analysis first (read-only, no changes)
codex exec "Analyse the repository structure and identify the top 5 areas with potential bugs"

# Then try a fix with --full-auto
codex exec "Fix the failing test in tests/unit/billing.test.ts and explain what was wrong" --full-auto
Tasks that used to consume 30–40% of a developer’s morning — fixing type errors, updating endpoints, migrating legacy patterns — can now be batched and executed before diving into manual work13. Queue up four or five Codex tasks, then shift to deep-focus work on harder problems. That two-tier approach is where the real productivity transformation happens.